Renovations for small bathroom
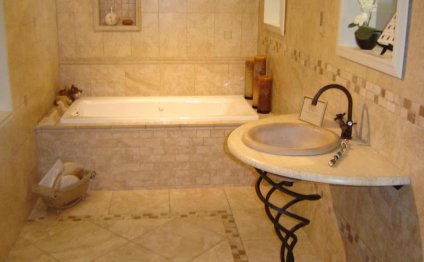
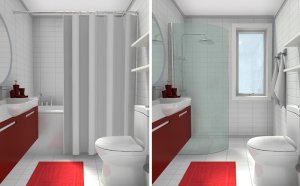
The bathroom after being remodeled
The remodeled bathroom has an updated look and is highly functional.
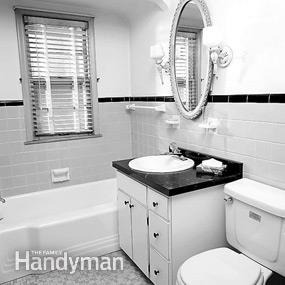
The bathroom before the remodel
The bathroom was uninspired and cramped before the remodel.
Our bathroom design is the perfect solution for the old, heavily used, small bathroom that you can never quite get clean enough. We not only pulled a few rabbits out of the hat to produce features that make the room easy to clean but also used smoke and mirrors to make it appear much larger.
In this article, we'll show you how to tear out an old bathroom and put in a new one, including details on:
- Installing a preassembled glass block window. You can have a window in your shower that will stand up to water.
- Replacing a bathtub with a spacious shower. A one-piece shower pan is a simple, leak-proof solution to the mistake-prone chore of traditional shower pan construction.
- Installing a state-of-the-art residential wall-hung toilet and sink. Having fewer dirt-catching corners and edges simplifies floor cleaning.
- Making a small (6 x 8-ft.) bathroom feel larger.
Although this new bathroom is a bit smaller because of additional plumbing walls, it appears larger. Substituting a shower for the bathtub, adding a large mirror, and using a wall-hung sink and toilet all contribute to the spacious feeling. This big-picture stuff is striking, but it's the step-by-step details that make it work. We cover the little kernels of information that will help your project go more smoothly and with fewer headaches.
A bathroom remodel is a big project. If you can only work weekends, your bathroom will be out of commission for two months or more. You'll need all your expertise as an experienced do-it-yourselfer because you'll have to tackle electrical, plumbing, tiling, drywalling, taping and even exterior siding. In this article, we'll deal mostly with the nuts and bolts of ripping out existing plumbing and replacing it correctly with new, easily installed PVC piping.
 Hire Pros Before You Get Bogged Down
Don't think you need to do the whole job solo if you don't feel qualified or able to perform all the tasks, especially the plumbing and electrical work. Pros will greatly speed up the project, which is particularly important if the bathroom under construction is the only one in the house.
You must get permits before tackling a bathroom remodel. Contact your building inspector to go over the scope of the project to find out exactly how much you're permitted to do. When your permit is granted, you'll receive a schedule list that'll tell you when to call for inspections.
How Much Does It Cost?
We didn't pinch pennies when it came to remodeling this 6 x 8-ft. bathroom. We chose top-shelf materials to make the room as striking as possible, but you can go with less expensive materials and still have a bathroom fit for a magazine cover. Here are our costs:
- Glass block window panel, 40 x 24 in., $160.
- Shower base, 34 in. x 5 ft., $375. We special-ordered this Swanstone base from a plumbing fixture supplier along with the wall-hung toilet and sink.
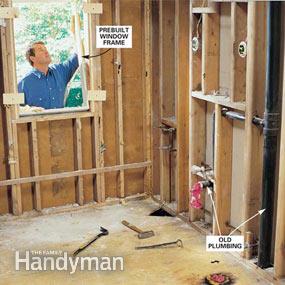
Photo 1: Fur out the window
Fur out the existing window opening to 2 in. wider and 2-1/2 in. taller than the dimensions of the glass block panel.
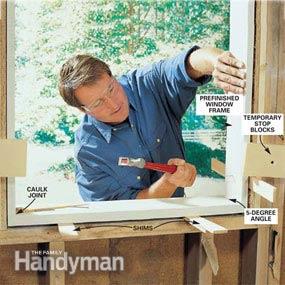 Photo 2: Nail stop blocks to the window frame
Tack stop blocks on the inside of the opening to keep the frame flush to the framing. Assemble the frame, then plumb and square it and nail it into the opening with 8d casing nails, shimming as needed.
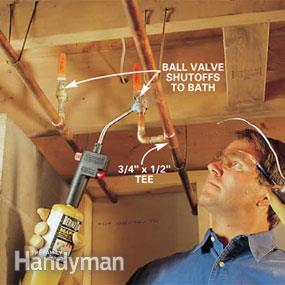
The special-order fixtures, fittings, shower pan, tile and glass block panel can take weeks to get in hand, so do the necessary legwork and ordering well in advance. Before gutting the bathroom, check to make sure that there are shutoffs for all the fixtures or a master shutoff for the entire bathroom. If not, buy ball valve shutoffs sized to fit your pipes. Then turn off the main water supply line where it comes into the house from outside, cut the pipes feeding the bathroom and install the new shutoffs right away (see Photo 7).
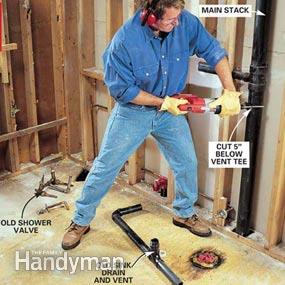
Disconnect the trap from the tub, remove any clips, fasteners or screws that hold the tub to the wall, and demolish the old cast iron tub with a sledgehammer. Remove the sink and toilet. Turn off the electricity at the main panel and remove light fixtures. Cap the wires with wire connectors. Then rip out the wall finishes and surfaces clean down to the studs and pull out any insulation. If your ceiling is in good shape, use a utility knife to cut the drywall along the edges so the wall materials will separate cleanly from the ceiling.
How to Order a Glass Block Window Panel
To size the glass block, remove the trim from the existing window and measure the rough opening. Subtract 2 in. from the width and the height to allow for the frame, then determine the panel size by counting the number of rows and courses that easily fits into the opening.
Glass block comes in 8-in. and 6-in. squares and 4 x 8-in. half-block rectangles. You'll need to choose between real mortar grout joints and clear silicone–joined blocks. We chose the silicone system because we liked the clean, uninterrupted look. Whichever way you go, buy the panel preassembled and banded together as one unit, ready to set into the opening.
 Remember that it's easy to make the opening smaller by using furring, but it can be an ugly task to make it bigger. When going with mortar-grouted panels, figure each block is 8 in. wide, then add 1/4 in. to both the total height and width. If you're ordering silicone-joined blocks, figure each block at 7-3/4 in. and don't add the extra 1/4 in.
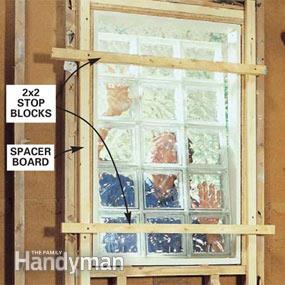
Photo 3: Get the window ready for tile
Rip two 3-ft.-long spacer boards the thickness of your tile plus 3/4 in. so the window will protrude 1/4 in. past the finished tile surface. Tack them to the sides of the window opening. Tack two 2x2s into the boards to hold the glass block panel in the proper position while you push it in from the outside
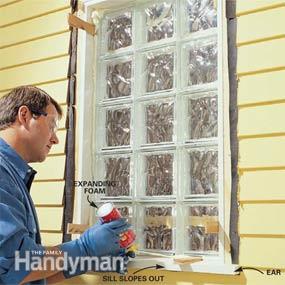
Photo 4: Inject the expanding foam
Tap shims between the panel and the frame to hold it evenly spaced on all four sides while injecting the expanding foam. After the foam cures, cut away any excess and caulk the 1/4-in. space between the panel and the jamb on the outside of the frame with silicone caulk. Finish off the trim and siding to match the outside of the house.
Converting a bathtub with a conventional window above it to a shower is dicey business, but the result is striking. Order a premade glass block window to fit your existing opening (see "How to Order a Glass Block Window Panel" in this article). Look under "Glass Block" in the Yellow Pages or online to find a supplier.
The key to a weatherproof, attractive glass block window both inside and out is to encase it in a custom-built wooden frame (Fig. A) with inside dimensions that are 1/2 in. taller and wider than the panel itself. That will give you room to adjust and shim the panel exactly and then inject expanding foam between the frame and the panel to lock it into the opening (Photos 3 and 4).
To begin, rip the top and side jambs to the thickness of the wall framing plus the exterior wall sheathing. The cement board will lap over the jambs. The windowsill should also be flush with the interior framing, but hang over the outside sheathing about 1-1/2 in. and have a 5-degree slope toward the outside to help shed water. To keep water from running behind the siding as it drips off the edge, cut a shallow groove (or saw kerf) in the bottom lip (Fig. A). Also, remember to flash behind the trim to keep the window watertight. Trim the window exterior to match the house, using caulk to seal between the trim and siding.
It's important to set the panel so it protrudes 1/4 in. past the finished tile surface (Fig. A). That way, a bead of caulk can seal the joint between the tile and block to keep water out of the wall cavity.

RELATED VIDEO


Share this Post
Related posts
Design for Small bathroom with shower
A small bathroom must contain all the elements of a large bath in less space. That s why planning a new one or remodeling…
Read More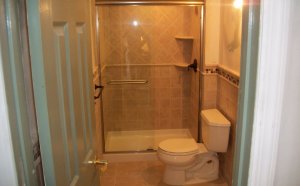
Images of bathroom Design for Small bathrooms
A modern bathroom is sophisticated place for you to relax and unwind. A quite sanctuary, modern bathrooms are equipped with…
Read Morelatest posts
-
 Double oven kitchen Design June 30, 2026
 -
 Renovation of kitchen June 25, 2026
 -
 Kitchen Layout Design Ideas June 20, 2026
 -
 Walk-in in bathroom Design June 15, 2026
 -
 Green Kitchen Design Ideas June 10, 2026
 -
 Bathroom Renovation Northern Virginia June 5, 2026
 -
 Before and After kitchen Renovations May 31, 2026
 -
 Kitchen Renovation Company May 26, 2026
 -
 Kitchen Tile Design Ideas Pictures May 21, 2026
 -
 Small kitchen Design Australia May 16, 2026